One key feature of the nopCommerce is its pluggable modular/layered architecture which allows additional functionality and presentation elements to be dynamically added to the application at runtime. This pluggable modularized architecture makes it easy to create and manage your nopCommerce based store site.
What are plugins in nopCommerce?
A recommended name for a plugin project is "Nop.Plugin.{Group}.{Name}". {Group} is your plugin group (for example, "Payment" or "Shipping"). {Name} is your plugin name (for example, "PayPalStandard"). For example, PayPal Standard payment plugin has the following name: Nop.Plugin.Payments.PayPalStandard. But please note that it's not a requirement. And you can choose any name for a plugin. For example, "MyGreatPlugin".
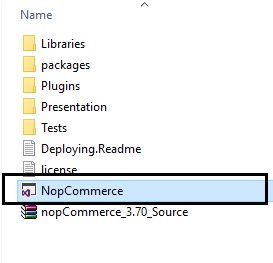
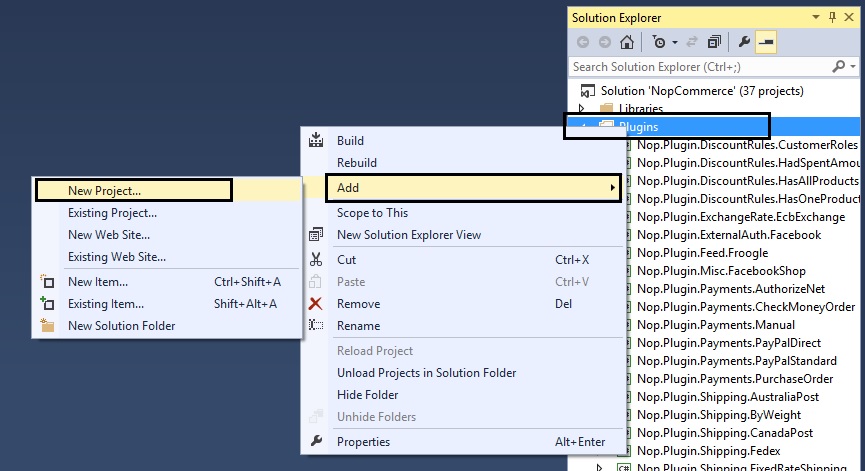
Step 2) Right click on the plugin folder: Add > New Project
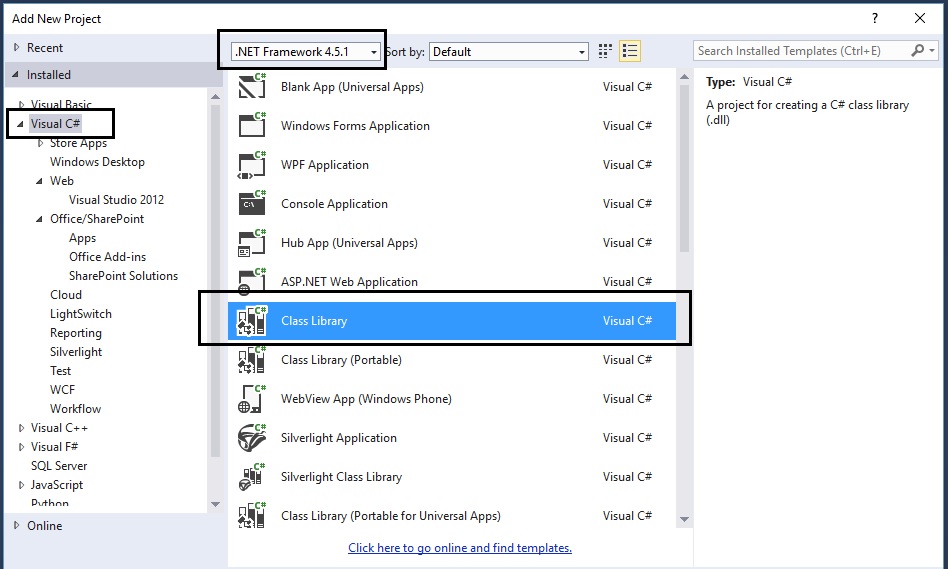
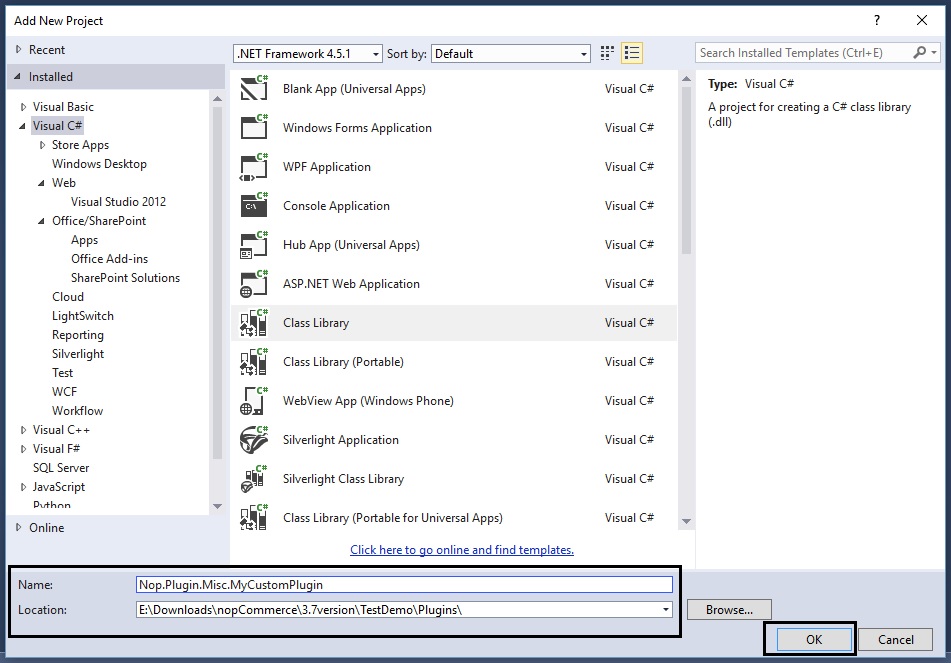
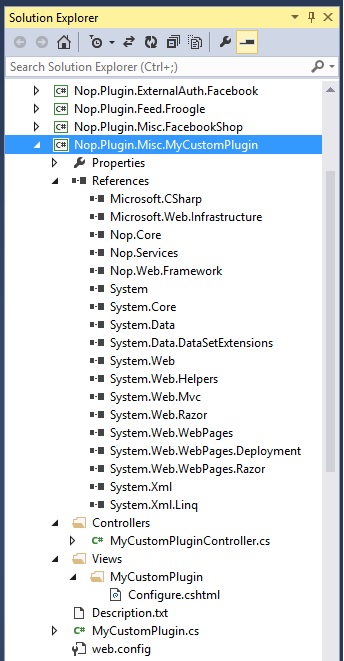
Step 5) Now, you should be able to see your custom plugin project in the solution explorer like this:
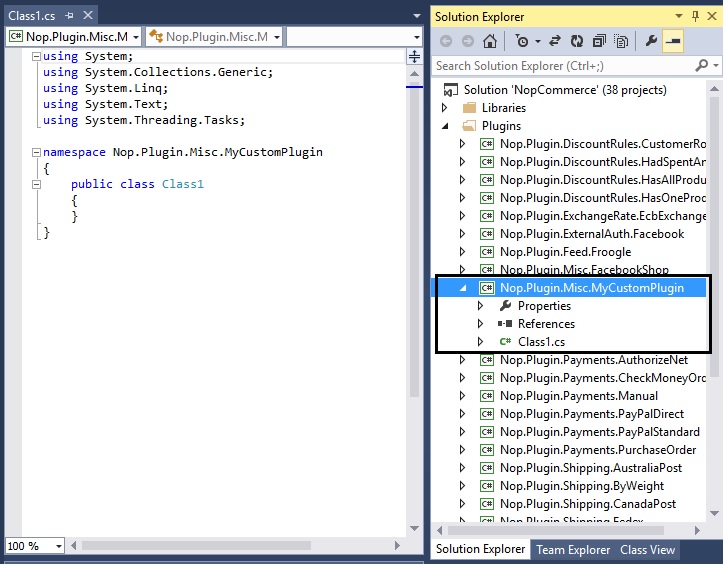
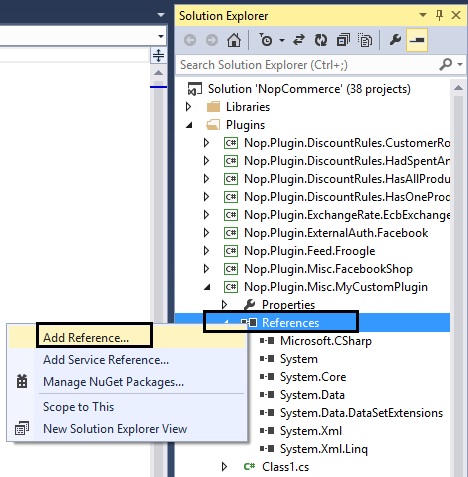
Step 6) Now is the time to add all the correct references. Go to: References > Add Reference…
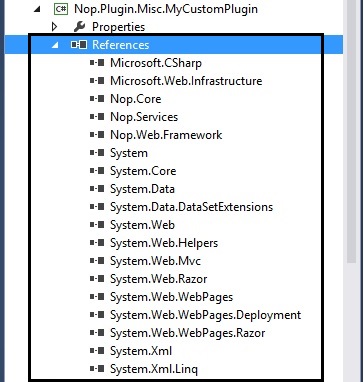
You will need to add all the references (see pic below). In case you are not able to find the right reference, simple go to any other plugin that has it and get the reference from there.
Group: Misc FriendlyName: MyCustomPlugin SystemName: MyCustomPlugin Version: 1.00 SupportedVersions: 3.70 Author: Lavish Kumar DisplayOrder: 1 FileName: Nop.Plugin.Misc.MyCustomPlugin.dllWeb.config: You should also create a web.config file and ensure that it's copied to output. Just copy it from any existing plugin.

Step 8) Add a class MyCustomPlugin.cs and use the following code:

using System;using System.Collections.Generic;using System.Linq;using System.Text;using System.Threading.Tasks;using System.Web.Routing;using Nop.Core.Plugins;using Nop.Services.Common;namespace Nop.Plugin.Misc.MyCustomPlugin{ public class MyCustomPlugin: BasePlugin, IMiscPlugin { /// <summary> /// Gets a route for provider configuration /// </summary> /// <param name="actionName">Action name</param> /// <param name="controllerName">Controller name</param> /// <param name="routeValues">Route values</param> public void GetConfigurationRoute(out string actionName, out string controllerName, out RouteValueDictionary routeValues) { actionName = "Configure"; controllerName = "MyCustomPlugin"; routeValues = new RouteValueDictionary { { "Namespaces", "Nop.Plugin.Misc.MyCustomPlugin.Controllers" }, { "area", null } }; } }}Step 9) Add a class MyCustomPluginController.cs (in folder “Controllers” within your plugin) and use the following code:

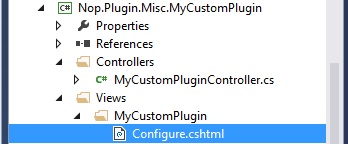
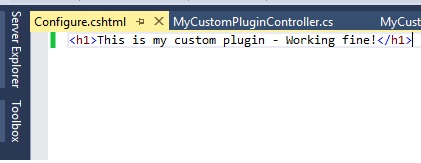
using System;using System.Collections.Generic;using System.Linq;using System.Text;using System.Threading.Tasks;using System.Web.Mvc;using Nop.Web.Framework.Controllers;namespace Nop.Plugin.Misc.MyCustomPlugin.Controllers{ [AdminAuthorize] public class MyCustomPluginController : BasePluginController { public ActionResult Configure() { return View("~/Plugins/Misc.MyCustomPlugin/Views/MyCustomPlugin/Configure.cshtml"); } }}Step 10) Add a Configure.cshtml (View) – In this case we are creating a blank plugin
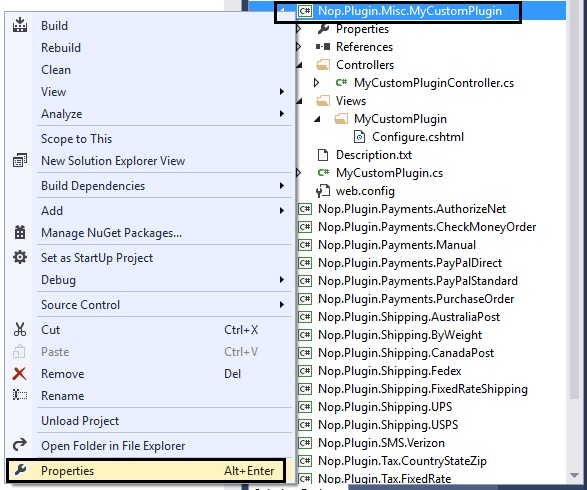
Step 11) Right click on the “Nop.Plugin.Misc.MyCustomPlugin” project and click “Properties”
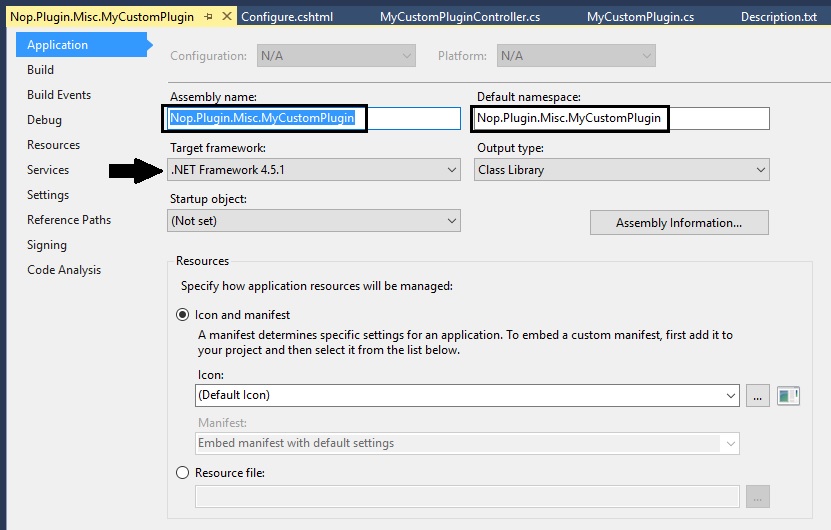
Make sure the assemble name and default namespaces are as follows (along with the .NET Framework):
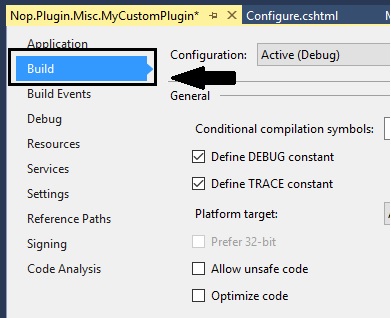
Go to the left tab “Build” in the properties window:

Step 12) Make sure everything is saved and look like this (and follows this structure):
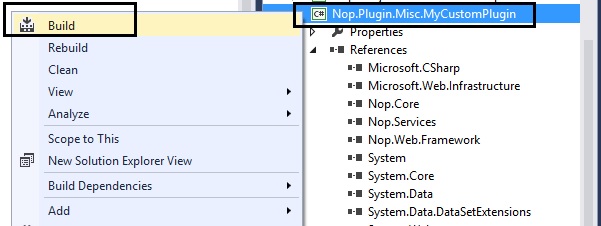
Step 13) Right click on your custom plugin project and click “Build”
Step 14) After re-building your project, run the whole solution and go to the Administration section and “Clear cache”

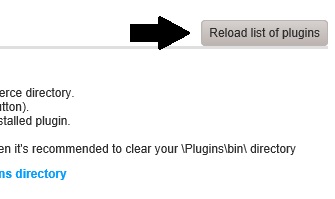
Step 15) Go to the plugin directory and click on the button “Reload list of plugins”
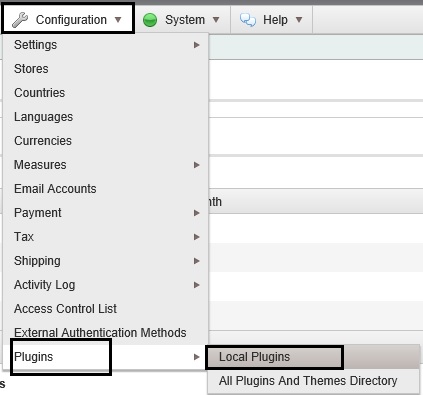
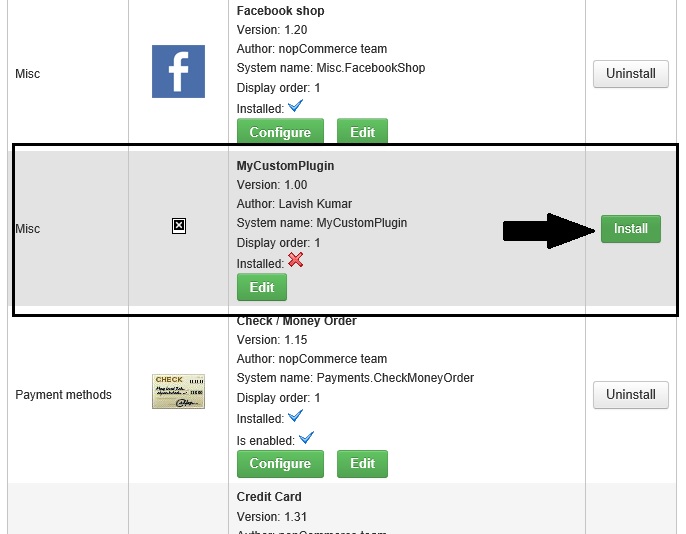
Step 16) Now, if you scroll down, you should be able to see your new custom plugin in the list of plugins - Click on the “Install” button for your custom plugin
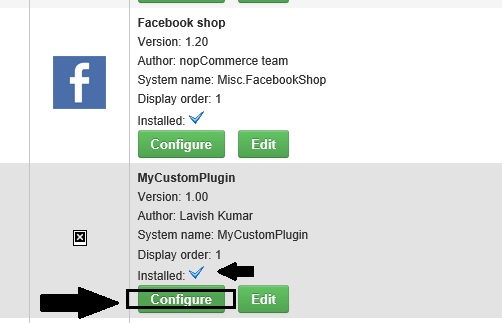
Step 17) Click on the “Configure” button for your custom plugin
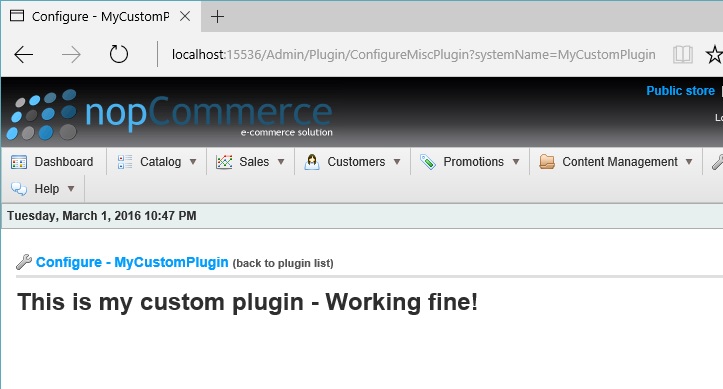
If everything worked correctly without any issues, you should be able to see this page:
Upgrading nopCommerce version may break plugins: Some plugins may become outdated and no longer work with the newer version of nopCommerce. If you have issues after upgrading to the newer version, delete the plugin and visit the official nopCommerce website to see if a newer version is available. Many plugin authors will upgrade their plugins to accommodate the newer version, however, some will not and their plugin will become obsolete with the improvements in nopCommerce. But in most cases, you can simply open an appropriate Description.txt file and update SupportedVersions field.
nopCommerce Version (used in this article): Version 3.70
Hope it helps - Let me know if you have any questions or comments.
- Part 2: Click Here
These are the topics that will be covered PART-2 of this guide:
- How to add a menu item from your custom plugin into the administration section
- How to override a default view from your customer plugin
- How to add JS and CSS references in your custom plugin

I'm writing from Turkey.
I tried your example and I gave following error when I click "Configure" button after installing the plugin:
The view '/Plugins/Misc.MyCustomPlugin/Views/MyCustomPlugin/Configure.cshtml' or its master was not found or no view engine supports the searched locations. The following locations were searched:
/Plugins/Misc.MyCustomPlugin/Views/MyCustomPlugin/Configure.cshtml
I didn't found any solving method for this message. Can you help me?
Thanks a lot
Ümit KARAÇİVİ
Have you tried a Clean/Rebuild of entire solution as well as your plugin?
By looking at your error, it seems like you marked your view(s) as embedded resource.
Right click on your view > Properties > Build Action > Make sure "Content" is selected & Copy to Output Directory is "Copy if newer".
Rebuild your plugin and test again.
You did great works it is working good thank you please let me know how to call that plugin to our page and specific region of page (view)
In the article:
/Plugins/Misc.MyCustomPlugin/Views/MyCustomPlugin/Configure.cshtml
You just add '~' before directory as below.
return View("~/Plugins/Misc.MyCustomPlugin/Views/MyCustomPlugin/Configure.cshtml");
Good catch! Thank you for pointing that out, I will correct it in the article :)
The solution should work for nopCommerce 3.80.
Please provide some details about the issue you are experiencing.
i try the same code and follow your instruction but when we click the configuration button after install then it go to the configurMiscPlugin.cshtml not goinng to our created view configure.cshtml.
Thanks in advance
Please make sure you have followed step 8 & 9 correctly to define the route of your cofigure page.
In your case, it seems like the event is not able to find your cofigure page when "Configure" button is clicked.
Please let me know (or provide details on what you did so far) if you are still experiencing any issues.
i have performed all the steps correctly but still i am facing the issue.
ConfigureMiscPlugin.cshtml file gets run instead of configure.cshtml whenever i click configure button.
Please provide me help.
Please open a topic about your issue in the discussion forum here and I'll help you: http://www.strivingprogrammers.com/boards/forum/6/nopcommerce
In your forum post, please mention all the steps that you followed along with your code.
i want to create own costume plugin but i got a error at build plugin >>>>>>>>>>. error ==== Severity Code Description Project File Line Suppression State
Error CS1705 Assembly 'Nop.Web.Framework' with identity 'Nop.Web.Framework, Version=3.9.0.0, Culture=neutral, PublicKeyToken=null' uses 'System.Web.Mvc, Version=5.2.3.0, Culture=neutral, PublicKeyToken=31bf3856ad364e35' which has a higher version than referenced assembly 'System.Web.Mvc' with identity 'System.Web.Mvc, Version=3.0.0.1, Culture=neutral, PublicKeyToken=31bf3856ad364e35' Nop.Plugin.Misc.MyCustomPlugin E:\dev\Work report\3-may-2017\Plugins\Nop.Plugin.Misc.MyCustomPlugin\CSC 1 Active
Please tell me how can slow this error,
Rajnish
As described in the error message, you have to check your plugin references and change version of System.Web.Mvc
One trick to fix this kind of issue is to search for "System.Web.Mvc" in your solution and see what other plugins are using this reference.Then copy the path of the System.Web.Mvc reference / DLL and use that to add this reference (System.Web.Mvc) again in your custom plugin. Then Rebuild!
I'm using nopCommerce 3.90.
I implemented all yours steps as mentioned till 15, but not able to get result as mentioned in step 16.
Can u plzz help.
Thanks
Are you getting any error or just not getting your plugin in the list?
I would suggest going over all the steps again and make sure you have implemented all the steps correctly.
As long as, you have followed all the steps, you should be able to see your plugin in the plugin list.
I'm writing from Turkey.
I Need to Help Can u help me :)
The view '~/Plugins/Misc.MyCustomPlugin/Views/MyCustomPlugin/Configure.cshtml' or its master was not found or no view engine supports the searched locations. The following locations were searched:
~/Plugins/Misc.MyCustomPlugin/Views/MyCustomPlugin/Configure.cshtml
Do you still need help?
I went through your code, tried to make new plugin
every time im getting one exception
probably it is in System.web.MVC
i tried searching online, i tried may solutions like insertin space in global.asax and matching version of System.Web.MVC Reference. did'nt remove my exception.
the exception is
"The controller for path '/Admin/Plugin/ConfigureMiscPlugin' was not found or does not implement IController."
source : System.Web.MVC
any solutions ?
working on 3.90
using nopcommerce 3.90
I'm fallow every steps my plugin created and build successfully.
But when we open admin section Configuration => Plugins=>Local Plugin
My plugin is not shown here.
I clear cache and click on "Reload list of plugins" button
Please help me.
Thanks in advance