Many ASP.NET developers are still new to MVC, as it can be a learning curve for any .NET developer, so I completely understand that it can be overwhelming to work with something that is totally different from webforms.
So, here I am writing an article on this topic to answer this common question and I hope it helps nopCommerce users who are looking for a solution to this problem / question.
I would like to point out one important thing here that if you are adding / creating a new page in your project / solution, if you plan to upgrade your nopCommerce version, you will have to add the custom page once again in your solution. Another good approach to keeping yourself away from this extra work of adding custom page again and again in every new version is to create a plugin and add your new page in form of a plugin to that you can simply install the plugin in your solution - Hence, you won't have to write the custom code for your custom page again and again. But, since we are focusing on adding a new page in nopCommerce in this particular article, I will focus on that process / steps specifically.
Please follow the following steps:
Step 1) You will need nopCommerce source code version in order to add custom page in your problem. The source code for nopCommerce 3.1 version can be downloaded here: https://nopcommerce.codeplex.com/downloads/get/711537
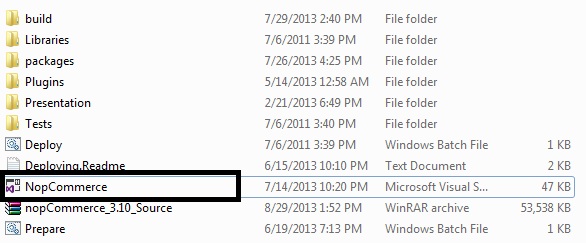
Step 2) Please open the nopCommerce solution in Visual Studio 2012
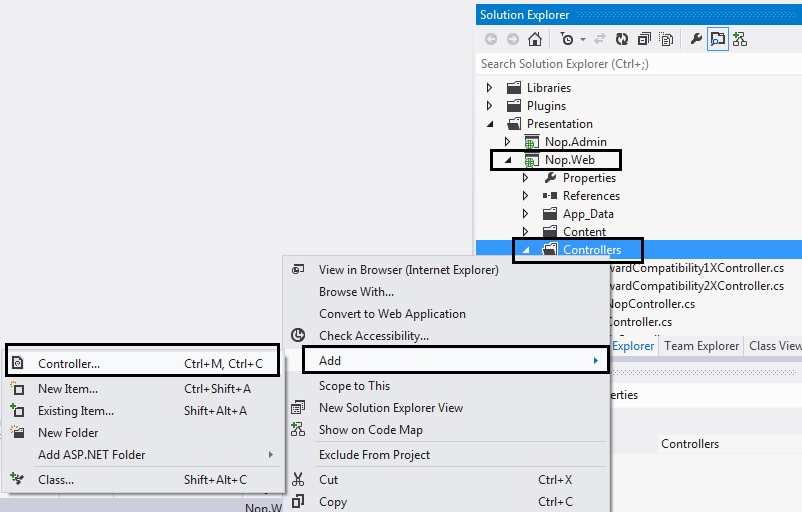
Step 3) Now, right click the "Controllers" folder > Select "Add" > Select "Controller.."
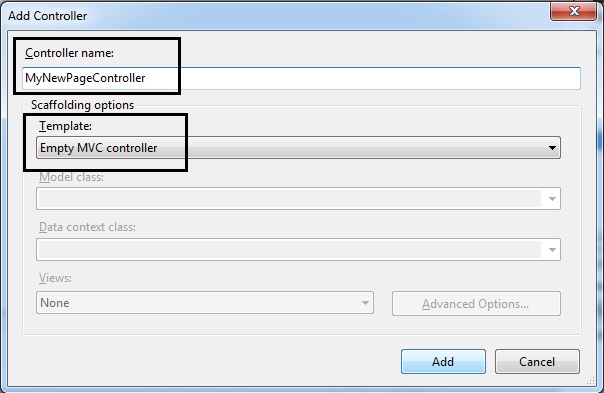
Step 4) Name the controller: I am naming it by changing the controller name from "Default1Controller" to "MyNewPageController"
In the Scaffolding options, make sure you have selected "Empty controller"
Step 5) Click "Add" and you will see the result in solution explorer as a new controller page called (in my case: "MyNewPageController.cs")
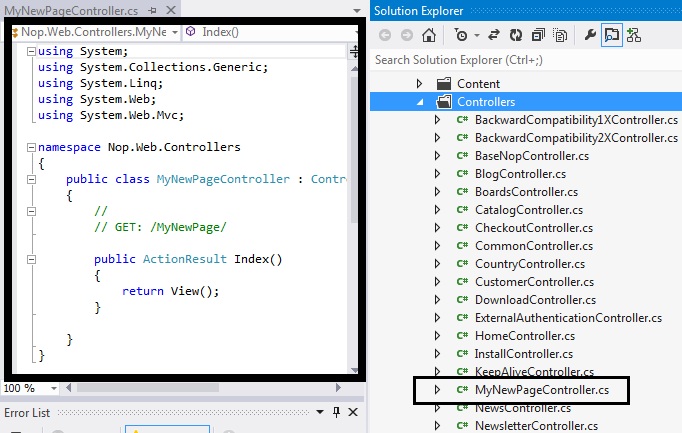
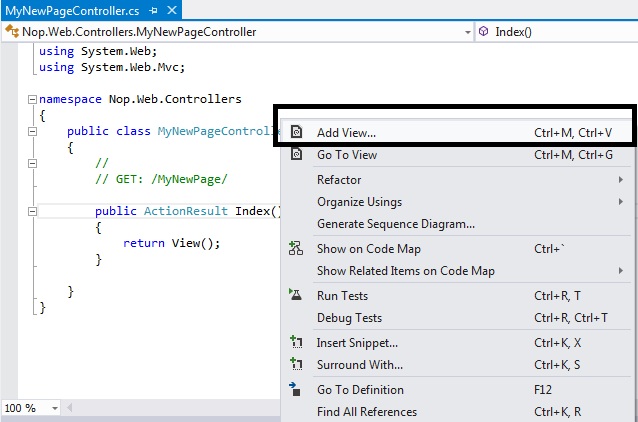
Step 6) In the left side (code): Right click on the Public ActionResult Index( ) line and select "Add View..."
Step 7) Leave the view name as "Index"
The view engine should be Razor (CSHTML)
The only box on this window that should be checked will be "Use a layout or master page:"
(Select the layout / masterpage by clicking the [...] button: I am selecting "_ColumnsTwo.cshtml" in this case)
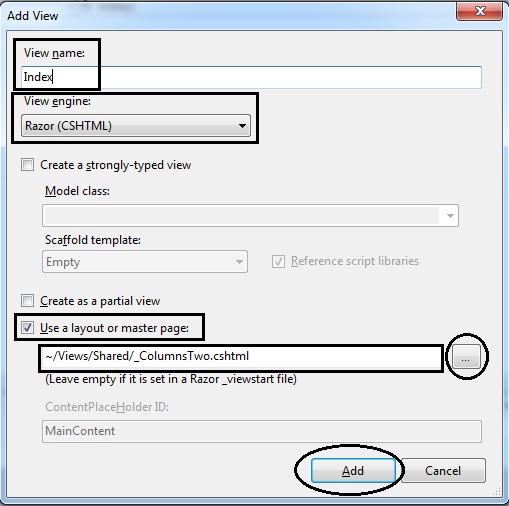
CLICK ADD BUTTON
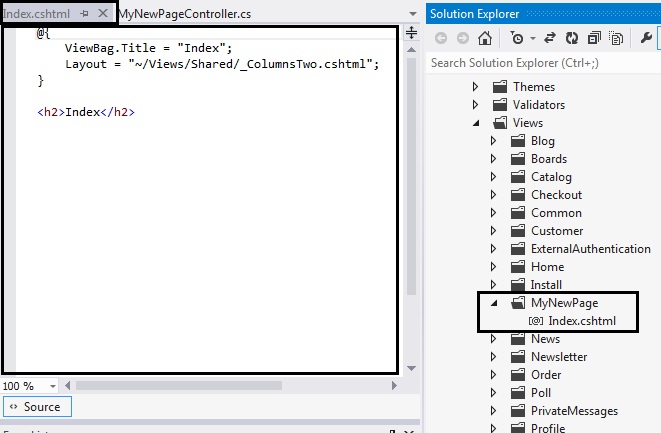
Step 8) Now, you will get a "Index.cshtml" page
(In the solution explorer, the location of this page will be in "Views" folder like this: Views > MyNewPage > Index.cshtml)
Step 9) In your solution, open RouteProvider.cs - You will find this file in this location: Nop.Web/Infrastructure/RouteProvider.cs
Step 10) Now, it is time to map the route so that solution can locate the new page. You will see different mapped routes like home page, install , products etc. Similar to that you need to map the route of your new page by adding the code like this:
//My New Page Test routes.MapLocalizedRoute("ThisIsMyNewPage", "MyNewPage", new { controller = "MyNewPage", action = "Index" }, new[] { "Nop.Web.Controllers" });In new { controller = "MyNewPage", action = "Index" }, = "MyNewPage" is the name of your controller
In routes.MapLocalizedRoute("ThisIsMyNewPage", "MyNewPage", = "MyNewPage" is the name of your View folder
Step 11) Now, recompile your solution and press F5
The url in the browser(address bar) might be something like this - http://localhost:15536/Views/MyNewPage/Index.cshtml
So, you might get error something like "Page not found" or "you typed the URL directly". No need to panic !
Change the url to say this - http://localhost:15536/YourPageName
(In my case, I will change the url to: http://localhost:15536/MyNewPage)
Now, you should see a page with the layout that you chose and in the content it should say "Index"
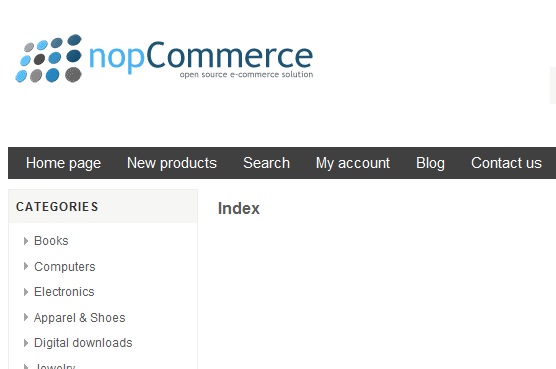
Now you can add your custom content/code in this page or you can create a topic and add topic section in the page so that you can maintain from the administration side easily.

I am new to NopCommerce and this article helped me a lot. One question though, why do you think I will lose the new custom page when upgrade NopCommerce? isn't it just like updating nopcommerce dll references in Nop.Web folder without missing up with other folders?
Thanks for your detailed explaination.
How can i modify the existing page. Ex: i want to edit product specification attribute page
Regards,
Karthick
Thanks for this tutorial. It was very helpful for a novice CSharp programmer.
I'm not sure I understand your description of the parameter in this statement "In routes.MapLocalizedRoute("ThisIsMyNewPage", "MyNewPage", = "MyNewPage" is the name of your View folder"
If this is true, then if I look at the parameters in this route mapping taken from the same RouteProvider.cs file,
routes.MapLocalizedRoute("RecentlyAddedProducts",
"newproducts/",
new { controller = "Catalog", action = "RecentlyAddedProducts" },
new[] { "Nop.Web.Controllers" });
the View folder should be "newproducts".
I do not see a "newproducts View folder.
Can you explain that?
Thanks,
Tony
Thanks for your comments.
Upgrading nopCommerce to new version does not JUST include updating dll, it includes updating the web pages too (all the files). Please take a look at this: http://www.nopcommerce.com/docs/80/upgrading-nopcommerce.aspx
You can always save the code for your custom page and try to add the same page code in your new upgraded version and it might work. There is NO guarantee that it will work because nopCommerce is constantly updated in regard to make improvements and so there could be minor changes in the structure of the nopCommerce architecture. This might make your custom page unusable as it won't be following the new updated structure / architecture.
For example: What I mentioned above in the article in Step 10 and Step 11 was never a required step when nopCommerce 2.X MVC version was released but now these steps are required in order to make your custom page work. So, you can always save your custom page and try adding it in your upgraded version and see if it works. It might work and if it doesn't then you can always tweak by looking at other pages what pattern they are following and customize your custom page code in the same order to make it work.
In my article I also mentioned about plugin which is an alternative to adding custom page that you can try: "Another good approach to keeping yourself away from this extra work of adding custom page again and again in every new version is to create a plugin and add your new page in form of a plugin to that you can simply install the plugin in your solution - Hence, you won't have to write the custom code for your custom page again and again."
Hope it helps...
a good guide. Can you make a guide to add a data table?
Which classes that are important and how to proceed.
Thank
I'm thinking that in my case (hopefully) there are a few extra steps to make this work... I need to create a custom page for a website that was setup without the source code.
So I'm wondering if I get the source code version same release as the live website (3.10) and create the custom page, can I deploy the custom page to the target website? what files would I need to patch on the live site if possible at all? Furthermore, if you haven't post it already, can you point me to good tutorial on how to make a custom page as a plugin. Thanks in advance for any help you can provide
I apologize that I didn't get back to you. I was just busy with a lot of projects and updating the site, please see: http://www.strivingprogrammers.com/Blog/post/Lavish-Kumar/22/Striving-Programmers-Community-site-has-been-updated-More-new-articles-and-tutorials-will-be-coming-soon/
To answer your question, the example that I gave in the above tutorial is just a sample page. You can have different name for your view folder other than "MyNewPage".
The best way to understand this is to add several test pages in your nopCommerce project with different names and you will know how it works.
You should also look into this tutorial (it can be very useful for you to understand .NET MVC): http://www.asp.net/mvc/tutorials/older-versions/getting-started-with-mvc/getting-started-with-mvc-part3
Thank you for your feedback. I understand what you are trying to accomplish as you used web version to publish your website. Any kind of modification (including add a new page like this tutorial) requires source code. So, yes you will need to download the source code of the version you are using for your website.
All you have to do is to just follow the above steps to add a new page in the source code version, rebuilt / recompile the solution - Then add then update the view folder and bin folder on your server and you should be able to see the addition on your live site.
If you have any question, please feel free to get back to me.
Thank you for your feedback :)
If you would like to learn how to write a nopCommerce plugin, here is a great tutorial which explain all the necessary steps: http://www.nopcommerce.com/docs/77/how-to-write-a-nopcommerce-plugin.aspx
Thank you for your tutorial. It's excellent and much needed.
Please could you help me with one problem though. I have carried out all the steps that you have listed but I am still getting the 'Page not found' error message whenever I try to view the page. Also, I noticed that you have step 9 missing. Is that a numerical error or has there been an actual step that has been left out?
Thank you and once again I appreciate the effort you put into this article.
There may be 2 possible issues:
1) Please make sure to set up a route for your controller/new page (Step# 9 & 10)
2) Please make sure while testing / running the page that you have your url correct - See step # 11 (your error is a common issue which is already mentioned in the tutorial)
Please let me know if you need any help.
Thank you very much for your very quick response. I still can't see the problem in what I have done.
Below is an explanation of the steps and the code that was produced when I followed your tutorial.
I created the controller called 'Repeat' in the Nop.Web/Controllers folder. The code is below:
using System;
using System.Collections.Generic;
using System.Linq;
using System.Web;
using System.Web.Mvc;
namespace Nop.Web.Controllers
{
public class Repeat : Controller
{
//
// GET: /Repeat/
public ActionResult Index()
{
return View();
}
}
}
I then created the View in the Nop.Web/Views folder.
This resulted in the creation of the following folder Nop.Web/Views/Repeat. A file called 'Index.cshtml' file was also created at the same time.
Below are the contents of the Index.cshtml file:
@{
ViewBag.Title = "Index";
Layout = "~/Views/Shared/_ColumnsTwo.cshtml";
}
<h2>Index</h2>
Then I went to the Nop.Web/Infrastructure/RouteProvider.cs file and added the following code:
//IRFAN - Repeat page
routes.MapLocalizedRoute("Repeat",
"repeat",
new { controller = "Repeat", action = "Index" },
new[] { "Nop.Web.Controllers" });
I then rebuilt the entire solution and hit F5.
So far, I can't see anything wrong in what I have done.
Please could you have a look to see if I have made a silly mistake.
Thank you once again.
First problem, I see is t he way you created / named your controller. If you read the step# 4 & step#5 above, you will see how the controller should be named and how the code looks like.
When you add new controller, it gives you a default name as ""Default1Controller" - If you carefully read the step#4, you will see, you are not supposed to replace the "Default1Controller" to "Repeat". You are only supposed to name keep the "Controller" and add your new page name before it.
In your case, it should be "RepeatController".
By naming the controller correctly, it will give you this code:
--------------------------------------------------------------
using System;
using System.Collections.Generic;
using System.Linq;
using System.Web;
using System.Web.Mvc;
namespace Nop.Web.Controllers
{
public class RepeatController : Controller
{
//
// GET: /Repeat/
public ActionResult Index()
{
return View();
}
}
}
--------------------------------------------------------------
In your code, you have "public class Repeat : Controller" - It should be "public class RepeatController : Controller"
Problem 2)
Second problem, I see is the way you linked your Layout to your "Repeat View page"
In your code, you have: Layout = "/Views/Shared/_ColumnsTwo.cshtml";
It should be this:
Layout = "~/Views/Shared/_ColumnsTwo.cshtml";
Make sure you have "~" in the path.
I would suggest to create a new page and follow the steps. As long as you follow the steps correctly, your new page should work.
Please let me know if you have any questions.
Thank you very much for this. I placed the Tilda sign at the beginning but I think your blog removed the character when I posted it.
I also looked at the RepeatController word and you are correct. That was where I made my mistake. I corrected this and it works perfectly now.
Once again, I have to thank you very much for your help and not just that, the quick responses too. It's very much appreciated.
Kind regards.
Please take a look at step# 9 and step# 10.
http://www.pronopcommerce.com/nopcommerce-id-less-url-structure-demystified-how-does-nopcommerce-270-and-280-resolve-urls
sorry for the confusion and many thanks for you prompt answer. appreciated.
Claudio
I am glad you found the solution to your question...
1) First go to admin section > Configuration > Languages > click "View string resources"
Now Add NEW
Resource Name: MyTitle.PageTitle.MyNewPage
Value: YOUR_PAGE_TITLE_GOES_HERE <-- Enter what you want as your page title
Now, SAVE
2) Go to your new page View code
3) Add page title and meta tag like this
@{
ViewBag.Title = "Index";
Layout = "~/Views/Shared/_ColumnsOne.cshtml";
//title MAKE SURE you can SAME RESOURCE NAME in below line what you just added
Html.AddTitleParts(T("MyTitle.PageTitle.MyNewPage").Text);
Html.AddMetaDescriptionParts("Here goes the meta description of the page.");
Html.AddMetaKeywordParts("meta keyword 1, meta 2, meta 3, meta 4 and so on");
}
4) Save the code changes and test your page
If you are comfortable with plugin then you can go that route also, it is pretty much same thing but different approach. It might need re-installation after upgrading nopCommerce (just like adding new page case) if there are major changes in the new version of nopCommerce. For plugin after upgrading your nopCommerce version, you still have to do following:
1) Make sure the SupportVersions field in Description.txt in your custom plugin file matches your current or new nopCommerce version.
2) Make sure that it exists in Nop.Web\Plugins\ directory
So, as you can see steps involved in both case either adding pages or creating plugin when you upgrade your version of nopCommerce so it if completely your choice which route you want to go and what you are comfortable with.
Once you add the new page in your project, make sure to re-build your project. Then just update 3 things on your server: "bin folder", "new controller" & "new page in your view folder"
For the update, please see my comment # 7 above.
Just to give you an idea. You will have to create the page again in the newer version of nopCommerce if you decide to upgrade. You can use the same content for the page from the old version if you like. So, it is just a matter of copy and pasting the page content once you re-create the page in the new version.
I hope this answers your question :)
I tried it step by step, as explained in your article.
Trying to access it, "http://www.mywebsite.com/MyNewPage" end up in PageNotFound.
PS: I use version 3.40.
----
using System.Web.Mvc;
using System.Web.Routing;
using Nop.Web.Framework.Localization;
using Nop.Web.Framework.Mvc.Routes;
namespace Nop.Web.Infrastructure
{
public partial class RouteProvider : IRouteProvider
{
public void RegisterRoutes(RouteCollection routes)
{
routes.MapLocalizedRoute("MyNewPageTest",
"MyNewPage",
new { controller = "MyNewPage", action = "Index" },
new[] { "Nop.Web.Controllers" });
//home page
routes.MapLocalizedRoute("HomePage",
"",
new { controller = "Home", action = "Index" },
new[] { "Nop.Web.Controllers" });
....
routes.MapLocalizedRoute("PAGENAME", "PAGENAME",
new { controller = "PAGENAME", action = "Index" },
new[] { "Nop.Web.Controllers" });
below, the pages I created, according to your article:
1) Infrastructure\RouteProvider.cs:
-------------------
using System.Web.Mvc;
using System.Web.Routing;
using Nop.Web.Framework.Localization;
using Nop.Web.Framework.Mvc.Routes;
namespace Nop.Web.Infrastructure
{
public partial class RouteProvider : IRouteProvider
{
public void RegisterRoutes(RouteCollection routes)
{
//We reordered our routes so the most used ones are on top. It can improve performance.
//NEW PAGES
//SeoLocalita
routes.MapLocalizedRoute("NewSeoLocalita", "SeoLocalita",
new { controller = "SeoLocalita", action = "Index" },
new[] { "Nop.Web.Controllers" });
//NEW PAGES
-------------------
[
-------------------------- I also tried with: ---------------------
routes.MapLocalizedRoute("SEOLOCALITA", "SEOLOCALITA",
new { controller = "SEOLOCALITA", action = "Index" },
new[] { "Nop.Web.Controllers" });
--------------------------------------------------------------------
]
2) Controllers\SeoLocalitaController.cs:
-------------------
using System;
using System.Collections.Generic;
using System.Linq;
using System.Web;
using System.Web.Mvc;
namespace Nop.Web.Controllers
{
public class SeoLocalitaController : Controller
{
//
// GET: /SeoLocalita/
public ActionResult Index()
{
return View();
}
}
}
-------------------
3) Views\SeoLocalita\Index.cshtml:
------------------
@{
ViewBag.Title = "Index";
Layout = "~/Views/Shared/_ColumnsTwo.cshtml";
}
<h2>Index</h2>
-------------------
4) I have compiled.
5) I uploaded using FTP in my server files:
Infrastructure \ RouteProvider.cs;
Controllers \ SeoLocalitaController.cs;
Views \ SeoLocalita \ Index.cshtml
6) In NopCommerce Administration, I emptied the cache and I restarted the application.
7) I went to the browser at: http://www.MyWebSite.com/SeoLocalita: ===> PageNotFound
I also tried with: http://www.MyWebSite.com/NewSeoLocalita: ===> PageNotFound
Where am I wrong?
Thanks for your cooperation.
PS: I am using the 3.40 version.
Please make sure you upload your "bin" folder to the server after you compile / re-build your project. Simply, take your "bin" folder from your development machine and upload it on your server. If it says, "bin" folder already exists on server - replace old one on server with the new "bin" folder.
Once you are done with this, try visiting your new page: www.domain.com/SeoLocalita
Let me know the results.
I tried again. Now, it works! But only locally.
I uploaded, on the server, these files/folder:
Infrastructure \ RouteProvider.cs;
Controllers \ SeoLocalitaController.cs;
Views \ SeoLocalita \ Index.cshtml
Bin\
Why online is not working? I need to load some other file or folder?
Nothing new?
Let me know if you have any question or need any help.
Here are the steps I did:
1. Created the Reseller(This is what I'm calling my newly created page) page as mentioned in the above steps.
2. In the new generated view I copied the Register.cshtml
Below is the code and error:
ResellerController.cs
________________________________
using System;
using System.Collections.Generic;
using System.Linq;
using System.Web;
using System.Web.Mvc;
namespace Nop.Web.Controllers
{
public class ResellerController : Controller
{
//
// GET: /Reseller/
public ActionResult Register()
{
return View();
}
}
}
Register.cshtml (My new view under the Resellers view folder)
______________________________________________________________
@model Nop.Web.Models.Customer.RegisterModel
@{
Layout = null;
}
@if (Model.CountryEnabled && Model.StateProvinceEnabled)
{
<script type="text/javascript">
$(function () {
$("#@Html.FieldIdFor(model => model.CountryId)").change(function () {
var selectedItem = $(this).val();
var ddlStates = $("#@Html.FieldIdFor(model => model.StateProvinceId)");
var statesProgress = $("#states-loading-progress");
statesProgress.show();
$.ajax({
cache: false,
type: "GET",
url: "@(Url.RouteUrl("GetStatesByCountryId"))",
data: { "countryId": selectedItem, "addSelectStateItem": "true" },
success: function (data) {
ddlStates.html('');
$.each(data, function (id, option) {
ddlStates.append($('<option></option>').val(option.id).html(option.name));
});
statesProgress.hide();
},
error: function (xhr, ajaxOptions, thrownError) {
alert('Failed to retrieve states.');
statesProgress.hide();
}
});
});
});
</script>
}
@using (Html.BeginForm())
{
@Html.AntiForgeryToken()
<div class="page registration-page">
<div class="page-title">
<h1>@T("Account.Register")</h1>
</div>
<div class="page-body">
@{
var validationSummary = Html.ValidationSummary(true);
}
@if (!MvcHtmlString.IsNullOrEmpty(validationSummary))
{
<div class="message-error">@validationSummary</div>
}
@Html.Partial("_ExternalAuthentication.AssociateMessage")
<div class="fieldset">
<div class="title">
<strong>@T("Account.YourPersonalDetails")</strong>
</div>
<div class="form-fields">
@if (Model.GenderEnabled)
{
<div class="inputs">
<label>@T("Account.Fields.Gender"):</label>
<div class="gender">
<span class="male">
@Html.RadioButton("Gender", "M", (Model.Gender == "M"), new { id = "gender-male" })
<label class="forcheckbox" for="gender-male">@T("Account.Fields.Gender.Male")</label>
</span>
<span class="female">
@Html.RadioButton("Gender", "F", (Model.Gender == "F"), new { id = "gender-female" })
<label class="forcheckbox" for="gender-female">@T("Account.Fields.Gender.Female")</label>
</span>
</div>
</div>
}
<div class="inputs">
@Html.LabelFor(model => model.FirstName, new { }, ":")
@Html.EditorFor(model => model.FirstName)
@Html.RequiredHint()
@Html.ValidationMessageFor(model => model.FirstName)
</div>
<div class="inputs">
@Html.LabelFor(model => model.LastName, new { }, ":")
@Html.EditorFor(model => model.LastName)
@Html.RequiredHint()
@Html.ValidationMessageFor(model => model.LastName)
</div>
@if (Model.DateOfBirthEnabled)
{
<div class="inputs date-of-birth">
<label>@T("Account.Fields.DateOfBirth"):</label>
@Html.DatePickerDropDowns(Html.FieldNameFor(x => x.DateOfBirthDay),
Html.FieldNameFor(x => x.DateOfBirthMonth),
Html.FieldNameFor(x => x.DateOfBirthYear),
DateTime.Now.Year - 110,
DateTime.Now.Year,
Model.DateOfBirthDay,
Model.DateOfBirthMonth,
Model.DateOfBirthYear)
@if (Model.DateOfBirthRequired)
{
@Html.RequiredHint()
}
@Html.ValidationMessageFor(model => model.DateOfBirthDay)
@Html.ValidationMessageFor(model => model.DateOfBirthMonth)
@Html.ValidationMessageFor(model => model.DateOfBirthYear)
</div>
}
<div class="inputs">
@Html.LabelFor(model => model.Email, new { }, ":")
@Html.EditorFor(model => model.Email)
@Html.RequiredHint()
@Html.ValidationMessageFor(model => model.Email)
</div>
@if (Model.UsernamesEnabled)
{
<div class="inputs">
@Html.LabelFor(model => model.Username, new { }, ":")
@Html.EditorFor(model => model.Username)
@Html.RequiredHint()
@Html.ValidationMessageFor(model => model.Username)
@if (Model.CheckUsernameAvailabilityEnabled)
{
@Html.Partial("_CheckUsernameAvailability")
}
</div>
}
</div>
</div>
@if (Model.CompanyEnabled || Model.DisplayVatNumber)
{
<div class="fieldset">
<div class="title">
<strong>@T("Account.CompanyDetails")</strong>
</div>
<div class="form-fields">
@if (Model.CompanyEnabled)
{
<div class="inputs">
@Html.LabelFor(model => model.Company, new { }, ":")
@Html.EditorFor(model => model.Company)
@if (Model.CompanyRequired)
{
@Html.RequiredHint()
}
@Html.ValidationMessageFor(model => model.Company)
</div>
}
@if (Model.DisplayVatNumber)
{
<div class="inputs">
@Html.LabelFor(model => model.VatNumber, new { }, ":")
@Html.EditorFor(model => model.VatNumber)
<span class="vat-note"><em>@T("Account.Fields.VatNumber.Note")</em></span>
</div>
}
</div>
</div>
}
@if (Model.StreetAddressEnabled || Model.StreetAddress2Enabled || Model.ZipPostalCodeEnabled
|| Model.CityEnabled || Model.CountryEnabled)
{
<div class="fieldset">
<div class="title">
<strong>@T("Account.YourAddress")</strong>
</div>
<div class="form-fields">
@if (Model.StreetAddressEnabled)
{
<div class="inputs">
@Html.LabelFor(model => model.StreetAddress, new { }, ":")
@Html.EditorFor(model => model.StreetAddress)
@if (Model.StreetAddressRequired)
{
@Html.RequiredHint()
}
@Html.ValidationMessageFor(model => model.StreetAddress)
</div>
}
@if (Model.StreetAddress2Enabled)
{
<div class="inputs">
@Html.LabelFor(model => model.StreetAddress2, new { }, ":")
@Html.EditorFor(model => model.StreetAddress2)
@if (Model.StreetAddress2Required)
{
@Html.RequiredHint()
}
@Html.ValidationMessageFor(model => model.StreetAddress2)
</div>
}
@if (Model.ZipPostalCodeEnabled)
{
<div class="inputs">
@Html.LabelFor(model => model.ZipPostalCode, new { }, ":")
@Html.EditorFor(model => model.ZipPostalCode)
@if (Model.ZipPostalCodeRequired)
{
@Html.RequiredHint()
}
@Html.ValidationMessageFor(model => model.ZipPostalCode)
</div>
}
@if (Model.CityEnabled)
{
<div class="inputs">
@Html.LabelFor(model => model.City, new { }, ":")
@Html.EditorFor(model => model.City)
@if (Model.CityRequired)
{
@Html.RequiredHint()
}
@Html.ValidationMessageFor(model => model.City)
</div>
}
@if (Model.CountryEnabled)
{
<div class="inputs">
@Html.LabelFor(model => model.CountryId, new { }, ":")
@Html.DropDownList("CountryId", Model.AvailableCountries)
@if (Model.CountryRequired)
{
@Html.RequiredHint()
}
@Html.ValidationMessageFor(model => model.CountryId)
</div>
}
@if (Model.CountryEnabled && Model.StateProvinceEnabled)
{
<div class="inputs">
@Html.LabelFor(model => model.StateProvinceId, new { }, ":")
@Html.DropDownList("StateProvinceId", Model.AvailableStates)
@if (Model.StateProvinceRequired)
{
@Html.RequiredHint()
}
@Html.ValidationMessageFor(model => model.StateProvinceId)
<span id="states-loading-progress" class="please-wait">@T("Common.Wait...")</span>
</div>
}
</div>
</div>
}
@if (Model.PhoneEnabled || Model.FaxEnabled)
{
<div class="fieldset">
<div class="title">
<strong>@T("Account.YourContactInformation")</strong>
</div>
<div class="form-fields">
@if (Model.PhoneEnabled)
{
<div class="inputs">
@Html.LabelFor(model => model.Phone, new { }, ":")
@Html.EditorFor(model => model.Phone)
@if (Model.PhoneRequired)
{
@Html.RequiredHint()
}
@Html.ValidationMessageFor(model => model.Phone)
</div>
}
@if (Model.FaxEnabled)
{
<div class="inputs">
@Html.LabelFor(model => model.Fax, new { }, ":")
@Html.EditorFor(model => model.Fax)
@if (Model.FaxRequired)
{
@Html.RequiredHint()
}
@Html.ValidationMessageFor(model => model.Fax)
</div>
}
</div>
</div>
}
@if (Model.NewsletterEnabled || Model.CustomerAttributes.Count > 0)
{
<div class="fieldset">
<div class="title">
<strong>@T("Account.Options")</strong>
</div>
<div class="form-fields">
@if (Model.NewsletterEnabled)
{
<div class="inputs">
@Html.LabelFor(model => model.Newsletter, new { }, ":")
@Html.EditorFor(model => model.Newsletter)
@Html.ValidationMessageFor(model => model.Newsletter)
</div>
}
@if (Model.CustomerAttributes.Count > 0)
{
@Html.Partial("_CustomerAttributes", Model.CustomerAttributes)
}
</div>
</div>
}
@if (Model.AllowCustomersToSetTimeZone)
{
<div class="fieldset">
<div class="title">
<strong>@T("Account.Preferences")</strong>
</div>
<div class="form-fields">
@if (Model.AllowCustomersToSetTimeZone)
{
<div class="inputs">
@Html.LabelFor(model => model.TimeZoneId, new { }, ":")
@Html.DropDownList("TimeZoneId", Model.AvailableTimeZones)
@Html.ValidationMessageFor(model => model.TimeZoneId)
</div>
}
</div>
</div>
}
<div class="fieldset">
<div class="title">
<strong>@T("Account.YourPassword")</strong>
</div>
<div class="form-fields">
<div class="inputs">
@Html.LabelFor(model => model.Password, new { }, ":")
@Html.EditorFor(model => model.Password)
@Html.RequiredHint()
@Html.ValidationMessageFor(model => model.Password)
</div>
<div class="inputs">
@Html.LabelFor(model => model.ConfirmPassword, new { }, ":")
@Html.EditorFor(model => model.ConfirmPassword)
@Html.RequiredHint()
@Html.ValidationMessageFor(model => model.ConfirmPassword)
</div>
@if (Model.DisplayCaptcha)
{
<div class="captcha-box">
@Html.Raw(Html.GenerateCaptcha())
</div>
}
@if (Model.HoneypotEnabled)
{
@Html.Raw(Html.GenerateHoneypotInput())
}
</div>
</div>
@if (Model.AcceptPrivacyPolicyEnabled)
{
<script type="text/javascript">
$(document).ready(function () {
$('#register-button').click(function () {
if ($('#accept-privacy-policy').is(':checked')) {
//do some stuff
return true;
}
else {
//just show validation errors, dont post
alert('@Html.Raw(HttpUtility.JavaScriptStringEncode(T("Account.Fields.AcceptPrivacyPolicy.Required").Text))');
return false;
}
});
});
</script>
<div class="accept-privacy-policy">
<input id="accept-privacy-policy" type="checkbox" name="accept-privacy-policy" />
<label for="accept-privacy-policy">@T("Account.Fields.AcceptPrivacyPolicy")</label>
<span class="read">@T("Account.Fields.AcceptPrivacyPolicy.Read")</span>
</div>
}
<div class="buttons">
<input type="submit" id="register-button" class="button-1 register-next-step-button" value="@T("Account.Register.Button")" name="register-button" />
</div>
</div>
</div>
}
@*<!DOCTYPE html>
<html>
<head>
<meta name="viewport" content="width=device-width" />
<title>Register</title>
</head>
<body>
<div>
</div>
</body>
</html>*@
RouteProvider.cs
__________________________________
//Reseller
routes.MapLocalizedRoute("Reseller",
"Reseller/",
new { controller = "Reseller", action = "Register" },
new[] { "Nop.Web.Controllers" });
Error that I'm getting:
____________________________________
Server Error in '/' Application.
Object reference not set to an instance of an object.
Description: An unhandled exception occurred during the execution of the current web request. Please review the stack trace for more information about the error and where it originated in the code.
Exception Details: System.NullReferenceException: Object reference not set to an instance of an object.
Source Error:
Line 7:
Line 8:
Line 9: @if (Model.CountryEnabled && Model.StateProvinceEnabled)
Line 10: {
Line 11: <script type="text/javascript">
Source File: f:\Work\U2Basket\website\nopCommerce_3.60_Source\Presentation\Nop.Web\Views\Reseller\Register.cshtml Line: 9
Stack Trace:
[NullReferenceException: Object reference not set to an instance of an object.]
ASP._Page_Views_Reseller_Register_cshtml.Execute() in f:\Work\U2Basket\website\nopCommerce_3.60_Source\Presentation\Nop.Web\Views\Reseller\Register.cshtml:9
System.Web.WebPages.WebPageBase.ExecutePageHierarchy() +198
System.Web.Mvc.WebViewPage.ExecutePageHierarchy() +105
System.Web.WebPages.StartPage.RunPage() +17
System.Web.WebPages.StartPage.ExecutePageHierarchy() +64
System.Web.WebPages.WebPageBase.ExecutePageHierarchy(WebPageContext pageContext, TextWriter writer, WebPageRenderingBase startPage) +78
System.Web.Mvc.RazorView.RenderView(ViewContext viewContext, TextWriter writer, Object instance) +235
System.Web.Mvc.BuildManagerCompiledView.Render(ViewContext viewContext, TextWriter writer) +107
System.Web.Mvc.ViewResultBase.ExecuteResult(ControllerContext context) +291
System.Web.Mvc.ControllerActionInvoker.InvokeActionResult(ControllerContext controllerContext, ActionResult actionResult) +13
System.Web.Mvc.ControllerActionInvoker.InvokeActionResultFilterRecursive(IList`1 filters, Int32 filterIndex, ResultExecutingContext preContext, ControllerContext controllerContext, ActionResult actionResult) +56
System.Web.Mvc.ControllerActionInvoker.InvokeActionResultFilterRecursive(IList`1 filters, Int32 filterIndex, ResultExecutingContext preContext, ControllerContext controllerContext, ActionResult actionResult) +420
System.Web.Mvc.ControllerActionInvoker.InvokeActionResultWithFilters(ControllerContext controllerContext, IList`1 filters, ActionResult actionResult) +52
System.Web.Mvc.Async.<>c__DisplayClass2b.<BeginInvokeAction>b__1c() +173
System.Web.Mvc.Async.<>c__DisplayClass21.<BeginInvokeAction>b__1e(IAsyncResult asyncResult) +100
System.Web.Mvc.Async.WrappedAsyncResult`1.CallEndDelegate(IAsyncResult asyncResult) +10
System.Web.Mvc.Async.WrappedAsyncResultBase`1.End() +49
System.Web.Mvc.Async.AsyncControllerActionInvoker.EndInvokeAction(IAsyncResult asyncResult) +27
System.Web.Mvc.Controller.<BeginExecuteCore>b__1d(IAsyncResult asyncResult, ExecuteCoreState innerState) +13
System.Web.Mvc.Async.WrappedAsyncVoid`1.CallEndDelegate(IAsyncResult asyncResult) +36
System.Web.Mvc.Async.WrappedAsyncResultBase`1.End() +54
System.Web.Mvc.Controller.EndExecuteCore(IAsyncResult asyncResult) +39
System.Web.Mvc.Controller.<BeginExecute>b__15(IAsyncResult asyncResult, Controller controller) +12
System.Web.Mvc.Async.WrappedAsyncVoid`1.CallEndDelegate(IAsyncResult asyncResult) +28
System.Web.Mvc.Async.WrappedAsyncResultBase`1.End() +54
System.Web.Mvc.Controller.EndExecute(IAsyncResult asyncResult) +29
System.Web.Mvc.Controller.System.Web.Mvc.Async.IAsyncController.EndExecute(IAsyncResult asyncResult) +10
System.Web.Mvc.MvcHandler.<BeginProcessRequest>b__5(IAsyncResult asyncResult, ProcessRequestState innerState) +21
System.Web.Mvc.Async.WrappedAsyncVoid`1.CallEndDelegate(IAsyncResult asyncResult) +36
System.Web.Mvc.Async.WrappedAsyncResultBase`1.End() +54
System.Web.Mvc.MvcHandler.EndProcessRequest(IAsyncResult asyncResult) +31
System.Web.Mvc.MvcHandler.System.Web.IHttpAsyncHandler.EndProcessRequest(IAsyncResult result) +9
System.Web.CallHandlerExecutionStep.System.Web.HttpApplication.IExecutionStep.Execute() +578
System.Web.HttpApplication.ExecuteStep(IExecutionStep step, Boolean& completedSynchronously) +157
Version Information: Microsoft .NET Framework Version:4.0.30319; ASP.NET Version:4.0.30319.34274
Please Help Me Out.
Can you tell me hoz to add a new page in nopcommerce 3.60
I tried to do as you explained but I still have an error page not found
Thanks
I followed exactly your procedure step by step.
In RouteProvider.cs, I added :
//My custom decline page
routes.MapLocalizedRoute("MyDecline",
"decline/",
new { controller = "MyDecline", action = "Index" },
new[] { "Nop.Web.Controllers" });
An advice? Your help, please
Example of something that works:
http://example.com/thiswillwork/
http://example.com/this_wont_work/
It is very frustrating... How do you fix this?
I'm using NopCommerce v3.8, but your your article is not not working for custom page addition, it may be because article is on 3.1.
I actually need help.