Why a password strength meter is important?
- To have a strong password that protects our personal information that we share everyday online
- To have a strong password that protects our sensitive information like credit card info, social security, bank account, PIN #s etc
How to create a strong password?
- A strong password should be at least 8 characters long
- A strong password should have special characters
- A strong password should have letters and numbers
- A strong password should have lowercase letters and uppercase letters
Tips:
- Make a practice of changing your password once in at least 2 months.
- Try to be creative with passwords like instead of using "star", try to use "*" sign or something like "snowflake"
- Avoid using correct spellings. For example: instead of word "effort", you should use "ef4t"
Now, it is time to dive into the code :)
1) In nopCommerce code, the register page is in this location:
RootFolder\Views\Customer\ Register.cshtml <-- Open this file
2) Locate this in your code:
<div class="form-fields"> <div class="inputs"> @Html.LabelFor(model => model.Password, new { }, ":") @Html.EditorFor(model => model.Password) @Html.RequiredHint() @Html.ValidationMessageFor(model => model.Password) </div> <div class="inputs"> @Html.LabelFor(model => model.ConfirmPassword, new { }, ":") @Html.EditorFor(model => model.ConfirmPassword) @Html.RequiredHint() @Html.ValidationMessageFor(model => model.ConfirmPassword) </div> @if (Model.DisplayCaptcha) { <div class="captcha-box"> @Html.Raw(Html.GenerateCaptcha()) </div> } </div>3) In this case, we need to add javascript, jquery and css in order to target our password field. So, in order to do that we will add this in our "Register.cshtml" page:
<script type='text/javascript'> $(function () { // This applies the Strength checking plug-in to your particular element $('#Password').strength({ strengthButtonText: "" }); // Fixup your Required indicator (inserts it explicitly after your password element) $('.required-indicator').insertAfter($("#Password")); });</script>Note: Here the JQuery $('#Password') will reference the password input field.
4) We also need to add respective JQuery like this:
<!-- Example jQuery --><script type="text/javascript" src="http://www.StrivingProgrammers.com/ScriptFiles_Extras/js/jquery.min.js"></script>
<!-- Strength.js --><script type="text/javascript" src="http://www.StrivingProgrammers.com/ScriptFiles_Extras/js/strength.js"></script>Note: "strength.js" is the file where it is defined what is a weak, medium and strong password. You can change it according to your requirements if you want.
5) Now, we will add our CSS styling to it like this:
<style type='text/css'> .strength_meter, .strength_meter * { display: inline; }</style>6) That's all - You can download t he complete source code for the page Register.cshtml: DOWNLOAD HERE
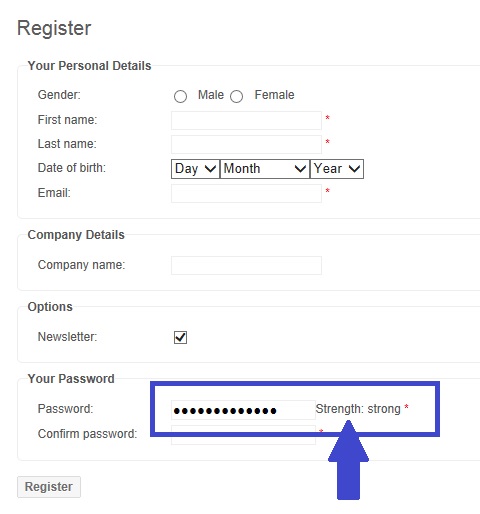
Here is the result:
P.S. This code is tested and works on nopCommerce 3.30 & 3.40 version
NOTE: In nopCommerce, you can define the minimum length for the password by going:
Administration > Configuration > Settings > All settings
Find: "customersettings.passwordminlength" and change the "Value"
Hope it helps...
(Source of JQuery file(s): http://git.aaronlumsden.com/)
UPDATE: nopCommerce 3.70 version solution
You need a little different approach to integrate this with nopCommerce 3.70 version (along with a few fixes). Please use this Register.cshtml view if you are using nopCommercee 3.70: DOWNLOAD FILE
You need a little different approach to integrate this with nopCommerce 3.70 version (along with a few fixes). Please use this Register.cshtml view if you are using nopCommercee 3.70: DOWNLOAD FILE
* Stated for Nop v3.3, but no mention of v3.4.
* Only on the registration area, not on the password changing areas under Admin nor Account.
* Wish it had graphical/colored strength meter rather than just text.
I'll think about writing another article on this based on graphical strength meter so keep an eye here on the website for any updates.
I need a strength meter that will display strength
in French or English depending on the Users
chosen application language